A2 pulley injury assessment & rehab guide for rock climbers
This is a long one. But if you have a finger injury, you sadly have a lot of extra time on your hands. Rock Rehab’s got you, so read up! Spend your time learning and getting your finger better, rather than climbing and making your finger worse.
The A2 pulley is THE most important structure in a climber’s body (ok maybe the brain is the ultimate winner, but that’s a much longer article). It’s a small band of tissue on the palm side of your finger, but it carries a massive mechanical burden every time you crimp. When it’s healthy, you never think about it. When it’s irritated or torn, you realize fast how much of your climbing depends on it.
This guide breaks down exactly:
What the A2 pulley does
Why climbing lovingly beats the shit out of it
How A2 injuries happen
How they’re diagnosed
And how to rebuild it with a structured rehab plan and a smart return to climbing
Anatomy: What the A2 Pulley Actually Does
Your fingers are not powered by the muscles in your hand. They’re powered by two large muscles in your forearm:
Flexor Digitorum Superficialis (FDS)
Flexor Digitorum Profundus (FDP)
These tendons run through a series of fibrous tunnels called annular pulleys (A1–A5) that keep the tendons pulled tight to the bone.
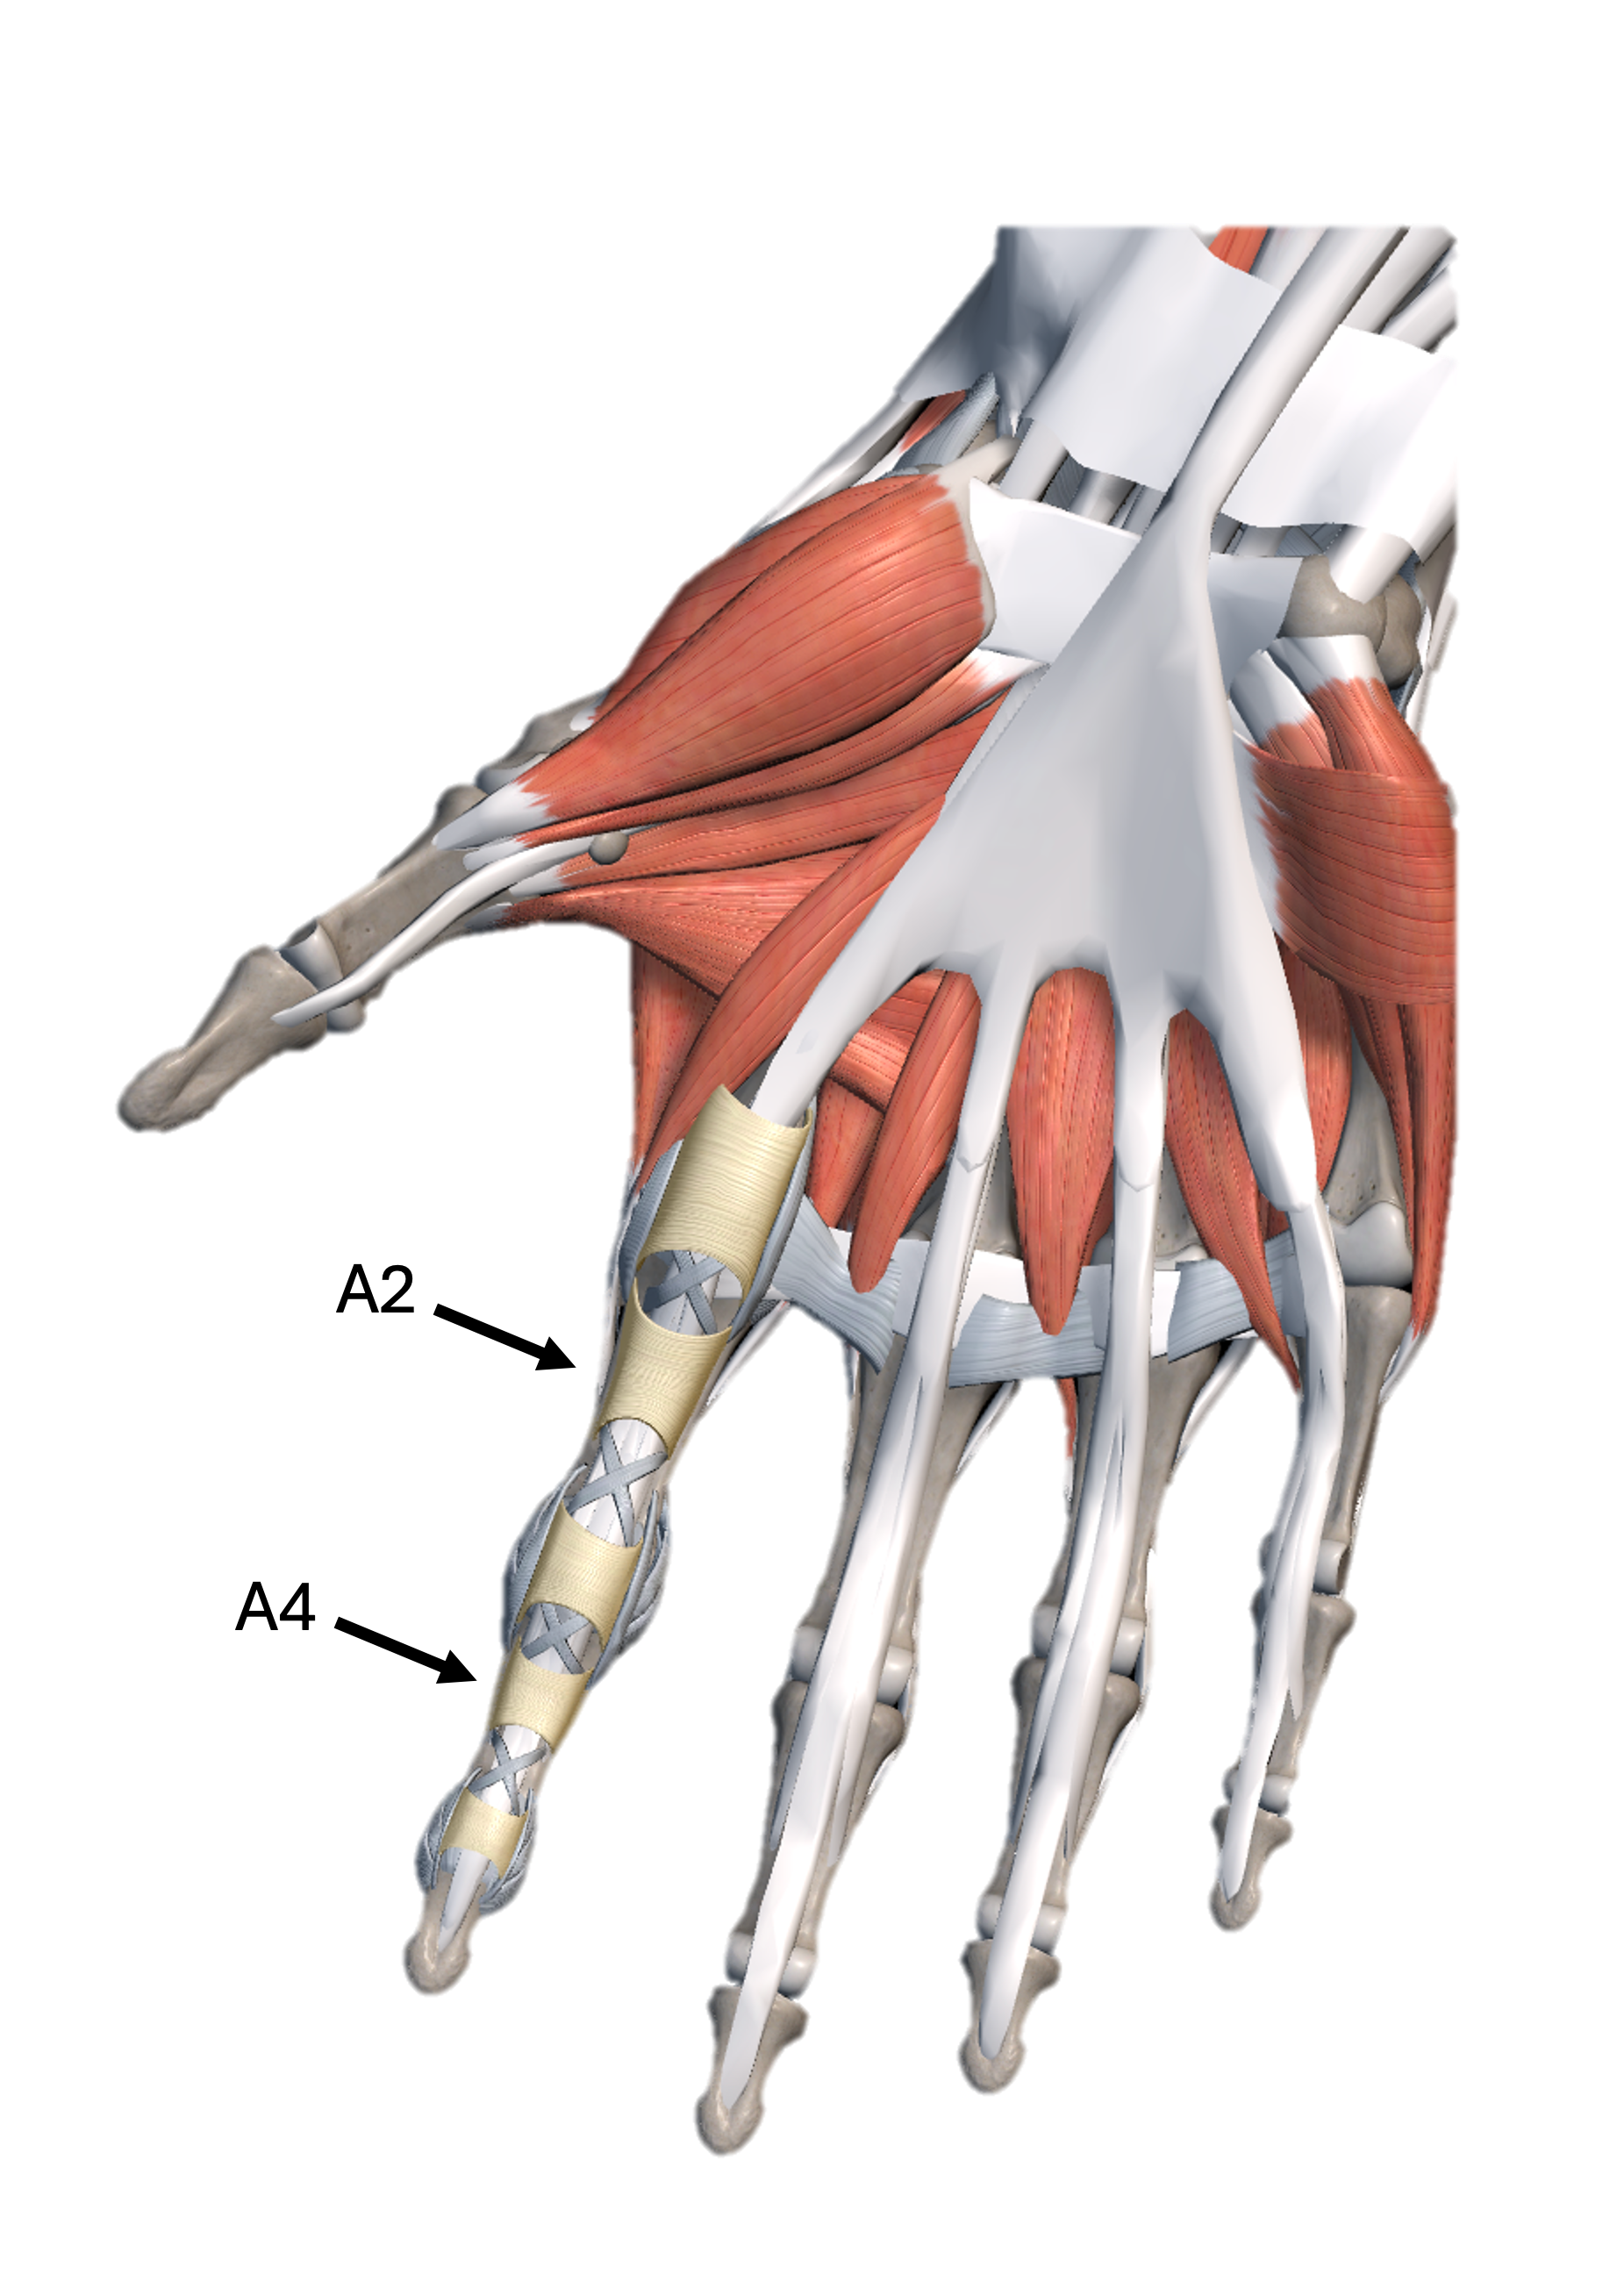
The A2 pulley is located over the proximal phalanx (segment of the finger closest to the palm) and is the primary restraint keeping the flexor tendons in place during loaded finger flexion. Both FDS and FDP run directly under it. The A2 pulley is the most commonly injured and the A4 pulley is the second most commonly injured.
Biomechanical work by Schweizer, Schöffl, and colleagues has repeatedly shown that the A2 experiences the highest loads during crimping positions compared to the other pulleys. This is why it’s the most commonly injured pulley in climbers.
Why Climbing Loads the A2 So Aggressively
When you crimp, the A2 is placed in a mechanically brutal position:
Classic biomechanical studies show that when load is applied at the fingertip, the force transmitted across the A2 pulley can be several times greater than the force you’re actually hanging with.
In practical terms:
A 150-lb climber crimping on a small edge can place roughly 85–100 pounds of force directly through a single A2 pulley — approaching the tissue’s failure threshold.
Full crimping places 31.4 times more force through the A2 pulley compared to open crimping.
That’s why pulley injuries don’t require a dramatic fall. Sometimes it’s just bodyweight, applied in the wrong position, one too many times.
(Schweizer 2009; Vigouroux 2006; Schöffl 2003)
How A2 Pulley Injuries Actually Occur
Pulley injuries usually don’t happen from one event. They happen from load + position + fatigue.
Common mechanisms
1. Acute/traumatic
A sudden shock load causes a powerful eccentric opening of the hand under load. That’s a fancy way of saying: you popped a foot and the sudden load on your finger causes the A2 pulley injury. This mechanism is more common than a typical dynamic movement or deadpoint, but those movements can also cause pulley injuries.These injuries are often, but not always accompanied by an audible pop.
2. Chronic/repetitive
The classic overuse mechanism, caused by repeated closed crimping on small edges. Fatigue + high intensity sessions = a drop in tissue tolerance. But you’re a climber so you keep climbing anyways. I SEE you because I AM you.
Clinical Diagnosis — How We Actually Assess This
One of the most useful clinical frameworks for A2 pulley injuries comes from:
Cooper & LaStayo (2019), Journal of Hand Therapy
A potential classification schema and management approach for individuals with A2 flexor pulley strain
This system uses four things:
Pain levels
Active range of motion
Resisted testing in climbing grip positions
Palpation pressure over the A2 pulley
It classifies injuries into Severe, Moderate, and Mild, which directly informs rehab.
Table 1: Classification Schema for A2 Flexor Pulley Strain
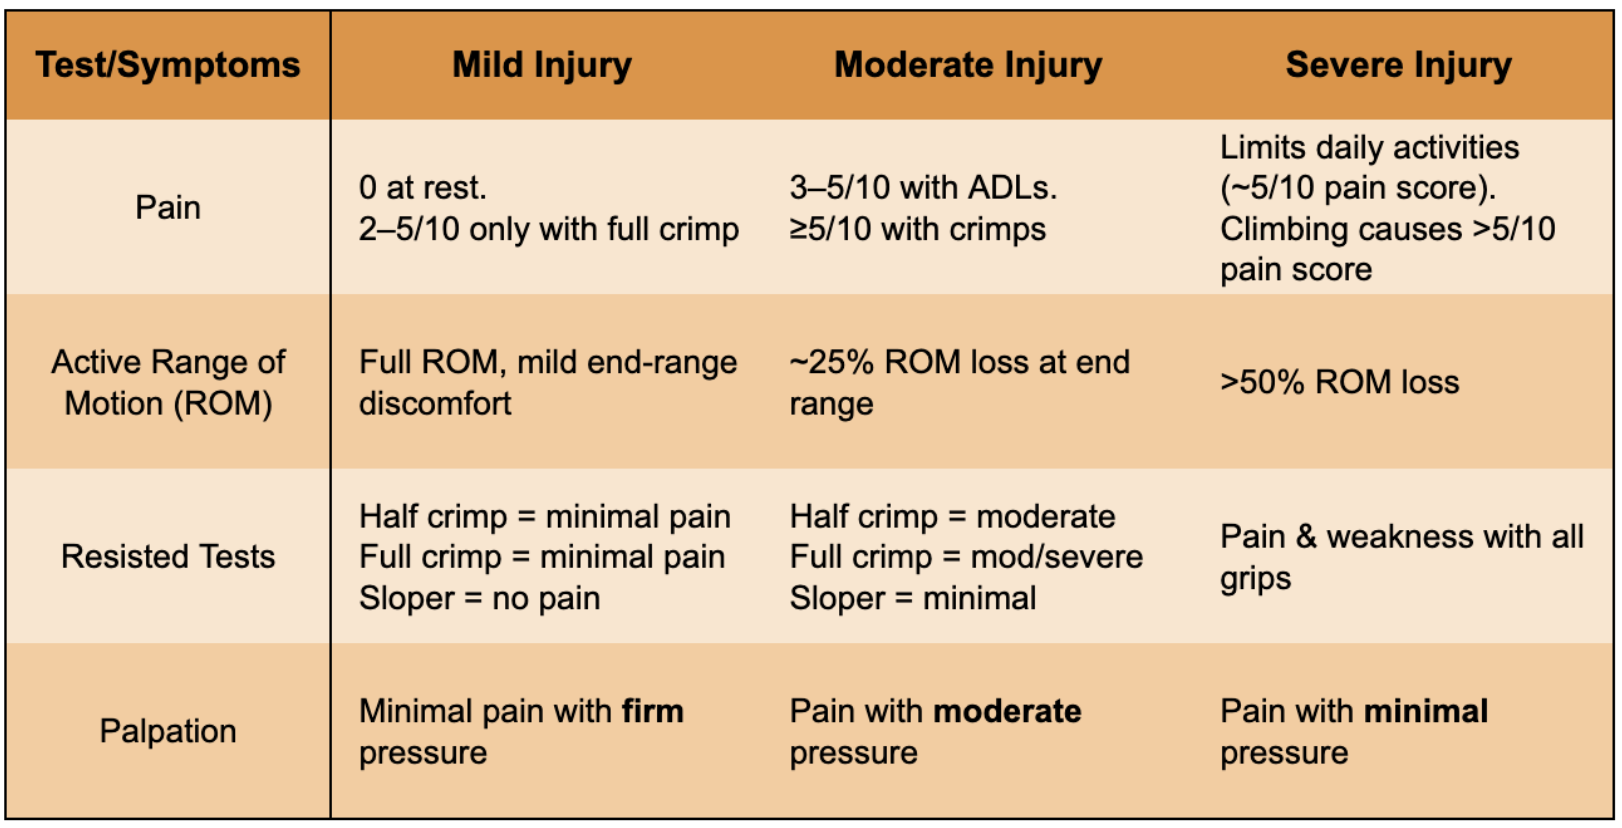
Reproduced from Cooper & LaStayo, 2019
Rehab: let’s actually fix this MF!
A smart pulley rehab plan is phased:
Calm shit down
Build shit up
But to be more specific, check out the table below. Once you’ve classified your injury severity (mild or moderate or severe from the table above), you can decide where to start your rehab process (table below). How long each phase lasts depends entirely on the severity classification.
Rehab Timelines by Injury Grade
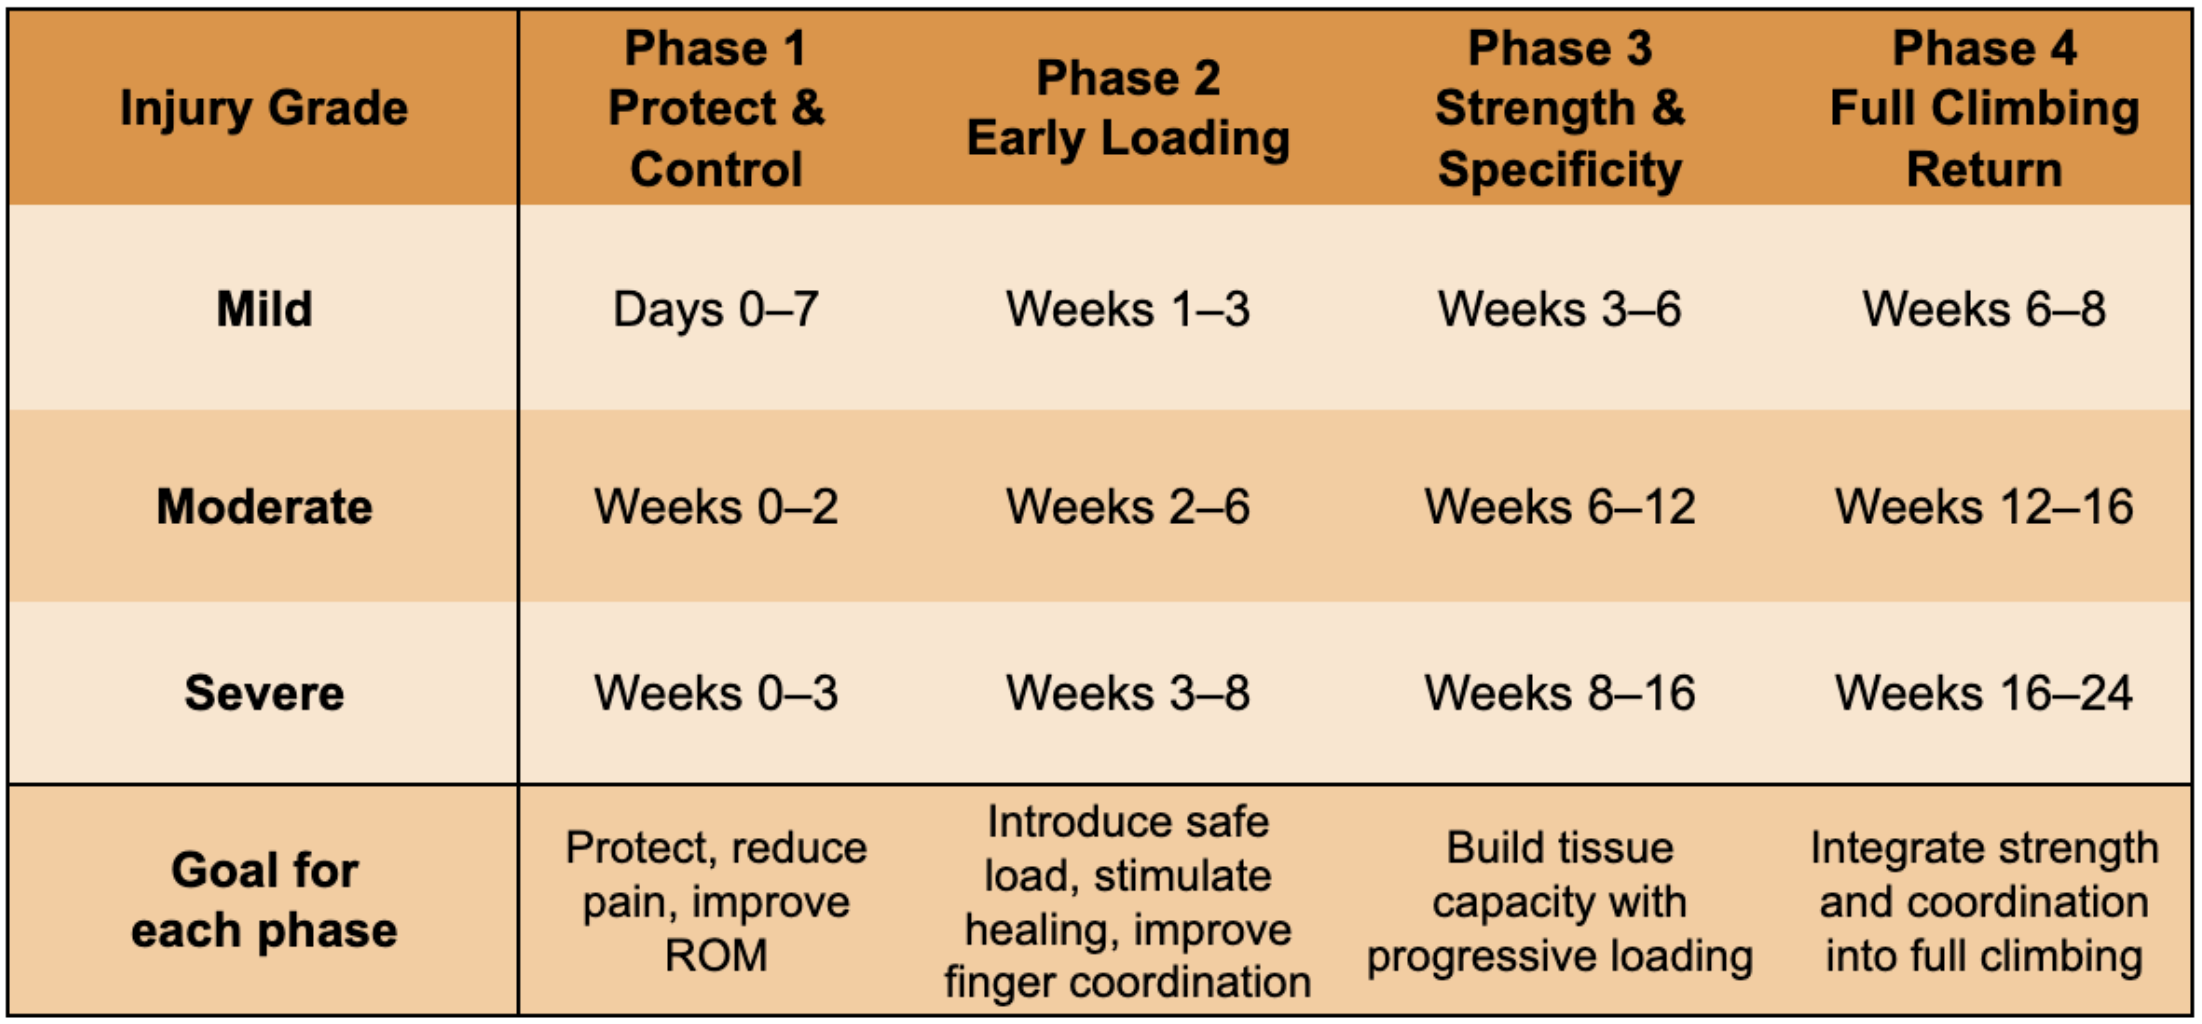
Read below to see what you should actually do during each phase
Phase 1: Protect & control
H-taping or pulley protection splint during daily use
No climbing
Tendon glides 2–3x/day
Avoid activities that increase pain over 3/10
Phase 2: Early loading
Initiate low level climbing
What’s ok: jugs, easy pinches, slopers
What’t not ok: crimps (especially half and full crimps), overhangs, dynamic movements
Climb under V2 and 5.10b
Initiate low level hangboarding (we’re talking like 20% of body weight). Those feet should be firmly on the ground.
Using open crimp: 7s on, 45s off = 1 rep. Perform 2 sets of 8 reps
2 min rest between sets
Avoid pain while hanging during this phase
Research shows low-intensity hangs with more reps are highly effective for finger strength with lower injury risk (Vigouroux; Baláš).
Phase 3: Strength & specificity
Now you earn half crimp back.
Using half crimp: 7s on, 60s off = 1 rep. Perform 2 sets of 6 reps
Progress load as tolerated
Introduce half crimps and low key overhangs (maybe not at the same time!)
Continue to avoid full crimps
Climb under V5 and 5.11c
Phase 4: Returning to full climbing
This is where most climbers screw it up. It’s easy to get too psyched!
Continue to progress half and open crimp hangboarding
Initiate using full crimps
Initiate dynamic movements
Gradually return to all wall angles and all hold types
Increase climbing difficulty and volume until you’ve returned to your previous level
Wean off of H-tape
Why This Works
Tendons and pulleys don’t heal from rest. They heal from progressive load applied at the right time and dosage.
Too little load → weak tissue
Too much load → setback
The sweet spot is graded exposure.
(Schneeberger 2016; Schöffl 2007; Schweizer 2011)
Final Thoughts for Climbers
All pulley injuries are not the same and your return to climbing plan should be informed by the severity of your injury and your level of experience with climbing.
It’s better to take smaller, consistent steps rather than taking big steps and having setbacks. This not only improves your tissue healing but also improves your head game by improving your confidence. Don’t underestimate how limiting your head game can be when getting back to crimping at your hardest.
Your technique, crimping coordination, or even the strength of your shoulders/elbows/wrists can be significant limiting factors of your recovery. Your rehab should comprehensively look at how your whole body functions while you’re climbing.
And if you’re not sure where you fall on that table or where to start or if your progress has plateaued?
That’s what Rock Rehab is for.
About the author:
Evan Ingerson is a PT who speaks fluent crimp and understands what it means to fall apart mid-project. Based in Santa Fe, NM, he’s been climbing for over 25 years and treating climbers for 9. He’s obsessed with helping climbers stay strong, fix stubborn injuries, and avoid bad rehab beta. When he’s not treating tendons, he’s probably hanging on a rope somewhere after falling off his project. Again.